In this post, I will show how to build a GitHub App. I will start with a basic Node.js and gradually turn it into a GitHub App. In later posts I will show other aspects of building and deploying GitHub Apps.
What is a GitHub App
A GitHub App is a Node.js App that can interact with the GitHub API. Or, at least, this is the way I like to understand it.
A GitHub App is a type of integration that you can build to interact with and extend the functionality of GitHub. You can build a GitHub App to provide flexibility and reduce friction in your processes, without needing to sign in a user or create a service account.
GitHub Apps can be installed directly on organizations and personal accounts and granted access to specific repositories. They come with built-in webhooks and narrow, specific permissions.
Once you have written the code for your GitHub App, your app needs to run somewhere. If your app is a website or web app, you might host your app on a server like Azure App Service. If your app is a client-side app, it might run on a user’s device. For example, you might deploy your App as an Azure Function App which will use the supplied GitHub webhook to consume various GitHub API events.
GitHub Apps run persistently on a server or compute infrastructure that you provide or run on a user device. They can react to GitHub webhook events as well as events from outside the GitHub ecosystem. They are a good option for operations that span multiple repositories or organizations, or for providing hosted services to other organizations. A GitHub App is the best choice when building a tool with functions that occur primarily outside of GitHub or require more execution time or permissions than what a GitHub Actions workflow is allotted.
What tools do I need?
Note: I am running Ubuntu
22.04as I think I get a betterNode.jsdevelopment experience, so if you are running directly on Windows the versions of the following could be different.
- Your computer or codespace should use Node.js version
v18.17.1or greater. For more information, see Node.js. - npm version
9.8.1or greater
Build the App
- Let’s start by building and running a basic hello world
Node.jsapp so we can see the fundamentals of how we get from a basicNode.jsapp to a full GitHub App. - Start by creating a file called
app.jsand put the following code inside it:
var msg = 'Hello World';
console.log(msg);
- then run
node app.jsin your terminal and you should seeHello Worldwritten to the console. If you don’t please have a look at this VSCode post to get help https://code.visualstudio.com/docs/nodejs/nodejs-tutorial - So now we have our first
Node.jsapp but we need to get it to the point where it becomes a GitHub App. For that we will need some dependencies. Let’s start with creating apackage.jsonfile and populating it. - To do this we can run
npm initand this will ask us a few questions to get ourpackage.jsonfile populated. After I rannpm initand answered the questions I got a fully populatedpackage.jsonfile as follows:
{
  "name": "node_js_github_app",
  "private": true,
  "version": "0.0.1",
  "type": "module",
  "scripts": {
    "server": "node app.js",
    "lint": "standard"
  },
  "description": "This is my my Node.js app that will become a GitHub App",
  "main": "app.js",
  "repository": {
    "type": "git",
    "url": "git+https://Github.com/russellmccloy/node_js_github_app.git"
  },
  "keywords": [
    "node",
    "Github",
    "app",
    "azure"
  ],
  "author": "Russell McCloy",
  "license": "ISC",
  "bugs": {
    "url": "https://Github.com/russellmccloy/node_js_github_app/issues"
  },
  "homepage": "https://Github.com/russellmccloy/node_js_github_app#readme"
}
- After that, run
npm installto create apackage-lock.jsonfile.package-lock.jsonis a file that is automatically generated by npm when a package is installed. It records the exact version of every installed dependency, including its sub-dependencies and their versions.
- Run
node app.jsin your terminal again to make sure you still get the Hello world output to ensure we didn’t break anything before continuing. - now we need to add some dependencies to get our App closer to being a GitHub App.
- At the end of our
package.jsonfile I added the following (add a new comma before it or you will break yourjson):
  "devDependencies": {
    "smee-client": "^1.2.3",
    "standard": "^17.0.0",
    "vite": "^4.1.0"
  },
  "dependencies": {
    "dotenv": "^16.0.3",
    "octokit": "^2.0.14"
  }
Now my package.json file looks like the following:
{
  "name": "node_js_github_app",
  "private": true,
  "version": "0.0.1",
  "type": "module",
  "scripts": {
    "server": "node app.js",
    "lint": "standard"
  },
  "description": "This is my my Node.js app that will become a GitHub App",
  "main": "app.js",
  "repository": {
    "type": "git",
    "url": "git+https://github.com/russellmccloy/node_js_github_app.git"
  },
  "keywords": [
    "node",
    "github",
    "app",
    "azure"
  ],
  "author": "Russell McCloy",
  "license": "ISC",
  "bugs": {
    "url": "https://github.com/russellmccloy/node_js_github_app/issues"
  },
  "homepage": "https://github.com/russellmccloy/node_js_github_app#readme",
  "devDependencies": {
    "standard": "^17.0.0",
    "vite": "^4.1.0"
  },
  "dependencies": {
    "dotenv": "^16.0.3",
    "octokit": "^2.0.14",
    "smee-client": "^1.2.3"
  }
}
- run
npm installagain so ourpackage-lock.jsonfile gets updated with the new dependencies.
Regarding the dependencies I added
smee-client- is a Webhook payload delivery service. This is useful when we are developing locally and need to receive webhook payloads. once we deploy our App to somewhere like an Azure Function App we wont need smee any more.standard- I think this is a bunch of the most common dependencies most developers might want with a Node App.vite- is a build tool that aims to provide a faster and leaner development experience for modern web projects. https://vitejs.dev/guide/. I am not sure I need this but I don’t want to remove it as I don’t want to risk breaking things as I have done many times today!dotenv- is a zero-dependency module that loads environment variables from a .env file into process.env. most apps need environment settings so this make sense to load this one.octokit- The all-batteries-included GitHub SDK for Browsers, Node.js, and Deno.
Getting back to building our GitHub App
- Firstly, you will need to register a new GitHub App. Please following these instructions: Register a GitHub App. the following list of instructions also relate to registering your GitHub App.
- You will need setup a repository that the GitHub App will act on. I created this repository: https://Github.com/russellmccloy/node_js_github_app_working_repo
- On the above mentioned repository you will need to install the GitHub app. follow these instructions https://docs.Github.com/en/apps/using-Github-apps/installing-your-own-Github-app
- Make sure you opt to create a
READMEfile when you set it up as we will enter this value in the Homepage URL: https://Github.com/russellmccloy/node_js_github_app_working_repo/blob/main/README.md when registering your GitHub App. - As we are not going to have anywhere, initially, to host our GitHub App (GitHub Apps are not hosted in GitHub. They could be hosted in Azure as a Function App for example.) we will use https://smee.io/ which is a Webhook payload delivery service.
- Go into smee and click on Start a new channel and then copy this url (https://smee.io/my_channel_id) into the Webhook URL field in the GitHub App registration page.
- Enter a Webhook secret into the registration page. This needs to match the
WEBHOOK_SECRETvalue in your.envfile mentioned further down this page. - In Repository Permissions go and select what you want.
-
I selected Pull Requests - Read / Write:

- in the Subscribe to Events section I selected
Pull request - Save your GitHub App registration.
- Now go and select to generate a private key. This will download a private key file to your machine. I saved this to
c:\node-js-Github-app.2023-08-14.private-key.pembut this is probably not the best place to save this. -
Now in root of your
Node.jsproject create a.envfile and add the following:APP_ID="375863" PRIVATE_KEY_PATH='c:\app-az-func-app.2023-08-10.private-key.pem' WEBHOOK_SECRET="<MY_SECRET_GET_YOUR_OWN>"
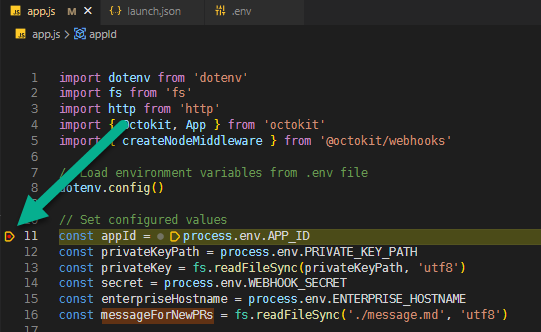
You will now need more code now as we are getting closer to becoming a GitHub App
As we now have most of the parts setup we will need more code to receive the events that GitHub emits.
Add the following code to your app.js
  import dotenv from 'dotenv'
  import fs from 'fs'
  import http from 'http'
  import { Octokit, App } from 'octokit'
  import { createNodeMiddleware } from '@octokit/webhooks'

  // Load environment variables from .env file
  dotenv.config()

  // Set configured values
  const appId = process.env.APP_ID
  const privateKeyPath = process.env.PRIVATE_KEY_PATH
  const privateKey = fs.readFileSync(privateKeyPath, 'utf8')
  const secret = process.env.WEBHOOK_SECRET
  const enterpriseHostname = process.env.ENTERPRISE_HOSTNAME
  const messageForNewPRs = fs.readFileSync('./message.md', 'utf8')

  // Create an authenticated Octokit client authenticated as a GitHub App
  const app = new App({
    appId,
    privateKey,
    webhooks: {
      secret
    },
    ...(enterpriseHostname && {
      Octokit: Octokit.defaults({
        baseUrl: `https://${enterpriseHostname}/api/v3`
      })
    })
  })

  // Optional: Get & log the authenticated app's name
  const { data } = await app.octokit.request('/app')

  // Read more about custom logging: https://Github.com/octokit/core.js#logging
  app.octokit.log.debug(`Authenticated as '${data.name}'`)

  // Subscribe to the "pull_request.opened" webhook event
  app.webhooks.on('pull_request.opened', async ({ octokit, payload }) => {
    console.log(`Received a pull request event for #${payload.pull_request.number}`)
    try {
      await octokit.rest.issues.createComment({
        owner: payload.repository.owner.login,
        repo: payload.repository.name,
        issue_number: payload.pull_request.number,
        body: messageForNewPRs
      })
    } catch (error) {
      if (error.response) {
        console.error(`Error! Status: ${error.response.status}. Message: ${error.response.data.message}`)
      } else {
        console.error(error)
      }
    }
  })

  // Optional: Handle errors
  app.webhooks.onError((error) => {
    if (error.name === 'AggregateError') {
      // Log Secret verification errors
      console.log(`Error processing request: ${error.event}`)
    } else {
      console.log(error)
    }
  })

  // Launch a web server to listen for GitHub webhooks
  const port = process.env.PORT || 3000
  const path = '/api/webhook'
  const localWebhookUrl = `http://localhost:${port}${path}`

  // See https://Github.com/octokit/webhooks.js/#createnodemiddleware for all options
  const middleware = createNodeMiddleware(app.webhooks, { path })

  http.createServer(middleware).listen(port, () => {
    console.log(`Server is listening for events at: ${localWebhookUrl}`)
    console.log('Press Ctrl + C to quit.')
  })
How to run locally and debug
Debugging
- Go to your Run and Debug section in VSCode
- Click on
create a launch.json file - Choose
Node.jsfrom the dropdown -
You
launch.jsonfile should now look like the following:{ "version": "0.2.0", "configurations": [ { "type": "node", "request": "launch", "name": "Launch Program", "skipFiles": [ "<node_internals>/**" ], "program": "${file}" } ] }
Now just hit F5 and the debugger will start:
Running without debugging
If you just want to run your app and watch what is going on in the Console then just run:
npm run server
And you should see the following output:
> node_js_github_app@0.0.1 server
> node app.js

Authenticated as 'node-js-github-app'
Server is listening for events at: http://localhost:3000/api/webhook
Press Ctrl + C to quit.
Note: you need to be listening to the web hook proxy endpoint so run the following in a new / different terminal window in VSCode:
npx smee -u https://smee.io/<XXXXXXXXX> -t http://localhost:3000/api/webhook
When you run this you will see the following:
Forwarding https://smee.io/8YB3XiGOLHR5SGh to http://localhost:3000/api/webhook
Connected https://smee.io/8YB3XiGOLHR5SGh
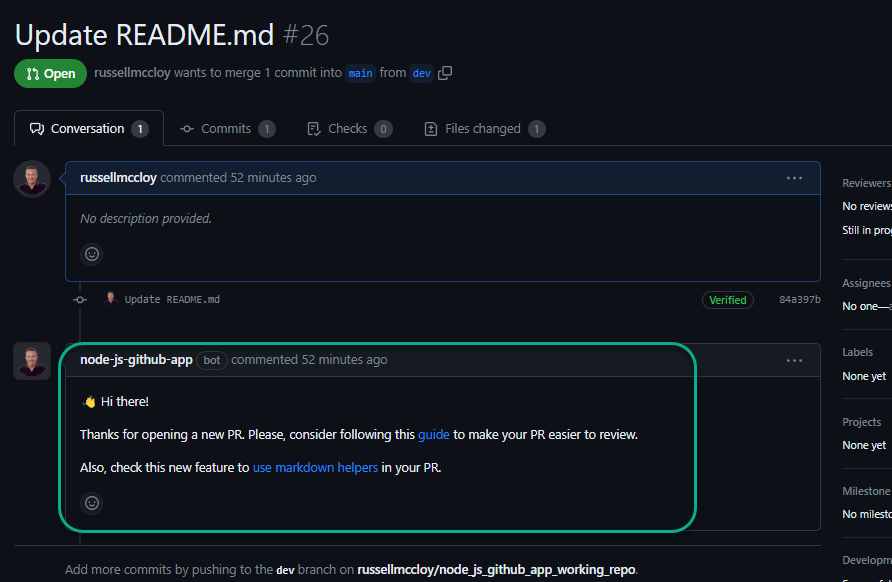
Now, when you raise a new Pull Request in the Repository that you installed the gitHub App into, the smee client Webhook payload delivery service will receive the webhook event from GitHub and your code will detect this as it is listening to smee
A message will be create in the pull request using this file 
here is the pull request showing the Message:
Best Practice
Best practices for creating a GitHub App
What are all the GitHub events I can consume
There are heaps of GitHub events you can consume. Here is a list:
That’s all for now.